
Introduction
This is a guide to setting up a L1 4G HID Prox reader using pre-encoded HID Wiegand String
numbers. It is based upon using Symmetry V7.0.1 and Secure Admin V4.1.16. Included are wiring
diagrams, configuration notes, and a number of different items to record whilst configuring the system.
This guide presumes you already have Symmetry and Secure Admin installed. It also assumes that
you have the Secure Admin system all on one machine, Server and Client.
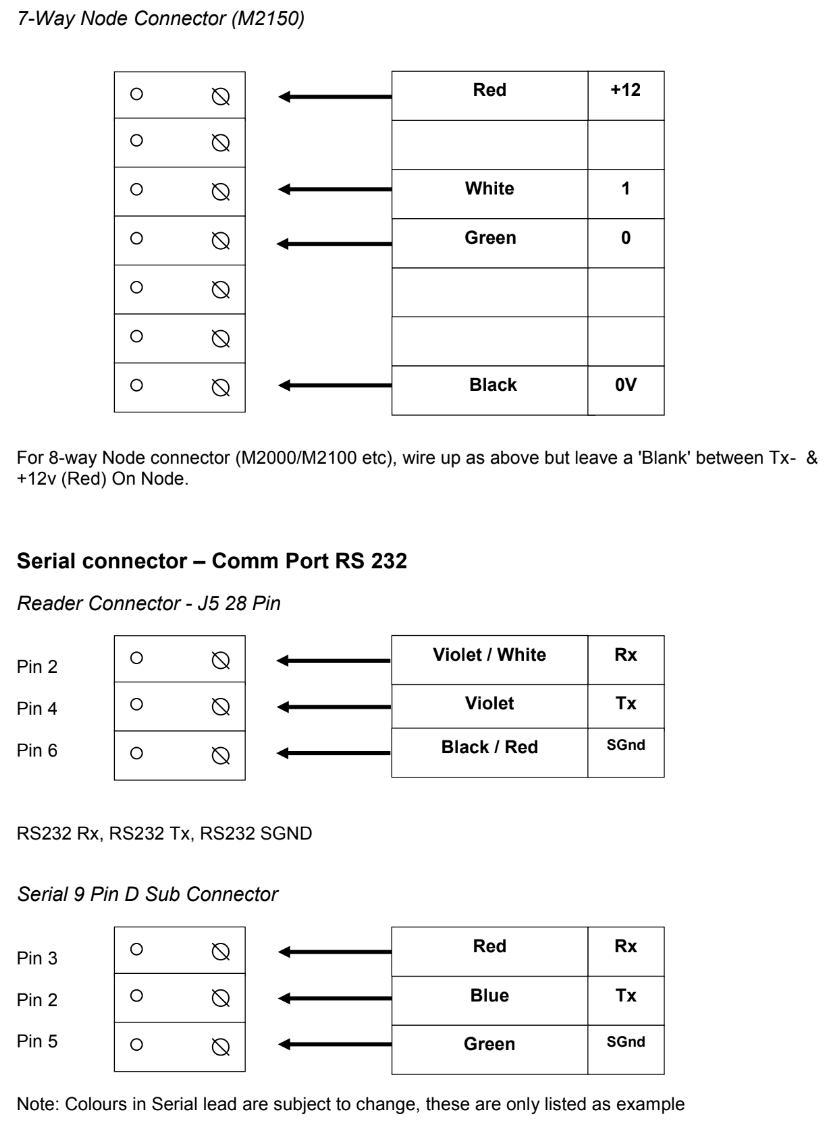
Wiring Diagrams
L1 4G Reader to Node Wiring
Reader Connector – J5 28 Pin

Configuring the Reader
In order to use the L1 HID Prox reader with Symmetry, you will need to configure and enrol users within the Secure Admin software which is provided by L1. Encoding is NOT done via Symmetry. This next part of the guide takes you through the steps required in order to get a Granted Access transaction into Symmetry. It assumes you are using 35 bit HID cards.
1. Launch the Secure Admin software and login.
2. In the left hand menu tree go to „Network‟
3. Select Register via server
4. Select the correct com port for your device and select „Scan‟, in this case the reader was
plugged in via USB and picked up under com 5.
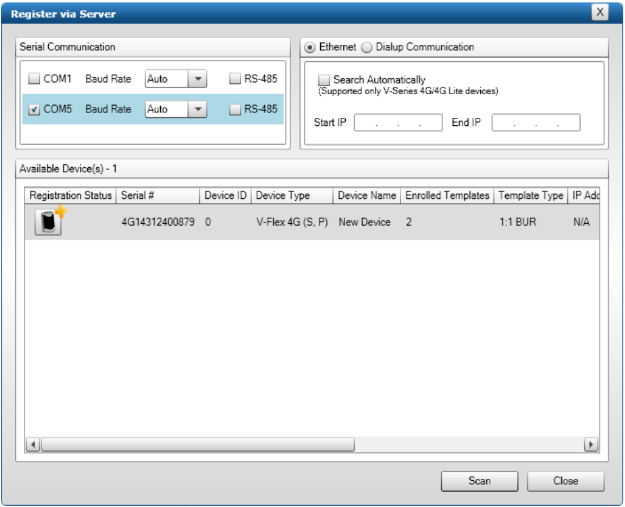
5. Now click on the Reader picture under „Registration Status‟ and it press next for the when
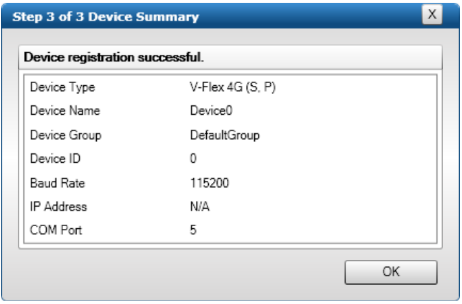
prompted. It should then display the message below stating it has now been registered.
6. Now select from the left hand menu „Device Settings‟ and browse to the device group you
assigned the reader to.
7. Upon clicking the reader in the menu, the right hand side window will be populated with the
different configuration screens you can use. Browse to the „Wiegand‟ section.
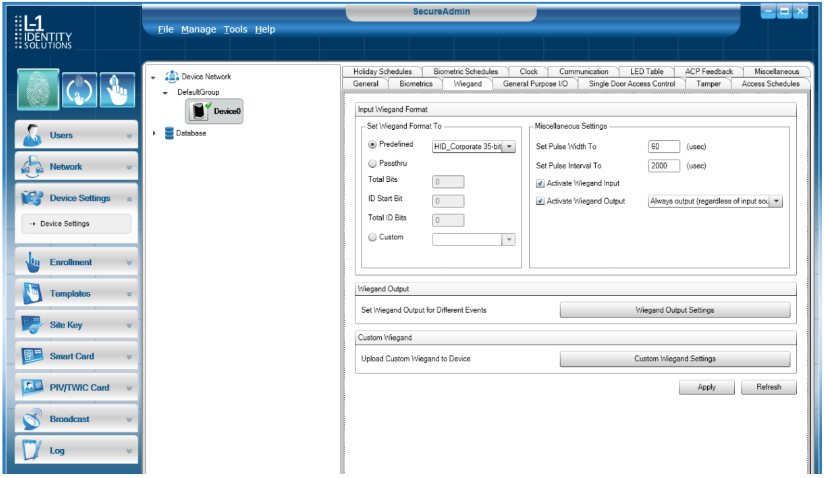
8. Depending upon which card type you are using, in terms of bits, you will need to amend the
Input Wiegand Format. To do this select „Predefined‟ and use the drop down list to set the
type of card you wish the reader to read. In this case set it to „HID_Corporate 35-bits‟.
This means that the reader will now read a 35-bit Wiegand string.
9. Now you need to select „Custom Wiegand Settings‟ and the following screen will appear.
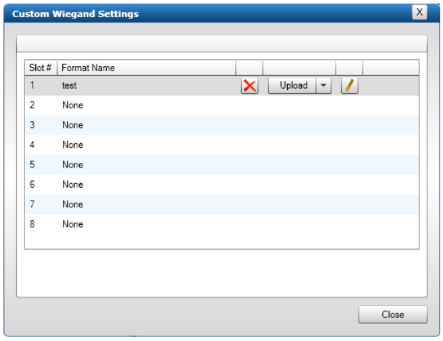
10. Now you need to enter a Custom Format into one of the slots. The screenshot above shows
an entry into Slot 1. To create this, click the „Pen‟ button.
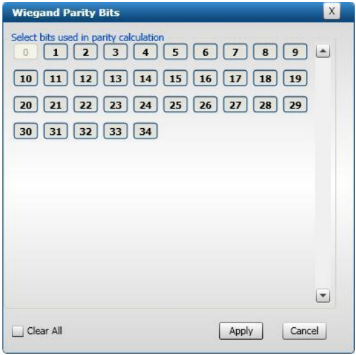
11. Within this screen you define the Wiegand format used for the reader to output to a Symmetry
Node.

The ‘Success Value’ is the Facility Code you wish to use in Symmetry.
NOTE: L1 does not allow you to use over 2047 for the Success Value.
12. You will need to click the box labelled „...‟ next to Parity Mask, and then click all the boxes that
appear.
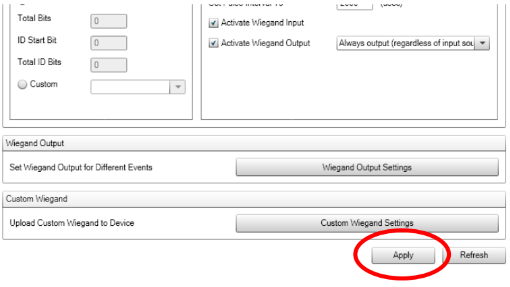
13. Once this is completed press „Apply‟ to both windows open.
14. You should now be back at the Device Settings screen.
15. Press the button labelled Wiegand Output Settings.
16. Within the Screen set the „Verification Pass‟ box to the Output format you have just defined.
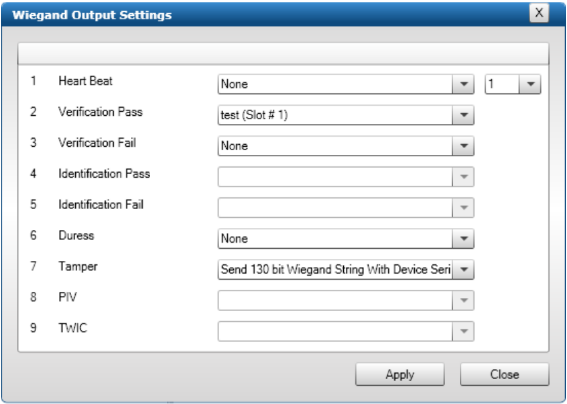
17. Press Apply.
18. Now on the main Device Setting Window you need to click „Apply‟ in the bottom right hand
screen for all the new changes to be saved.
Enrolling
In order to enroll a card holder into the system, Secure Admin will be used to capture and create a
fingerprint template. This template ID is then used as the Symmetry Card Holder's Card Number in
order to gain access at the Node. The next steps outline the method for doing this. This section
assumes you have the reader connected using your preferred method of communication, the setup of
which is outside the use of this guide.
Secure Admin Configuration
1. Select „Enrolment‟ from the left hand menu and then „Fingerprint Quick Enrolment‟.
2. This screen allows you to then define a Wiegand String to a given finger print.
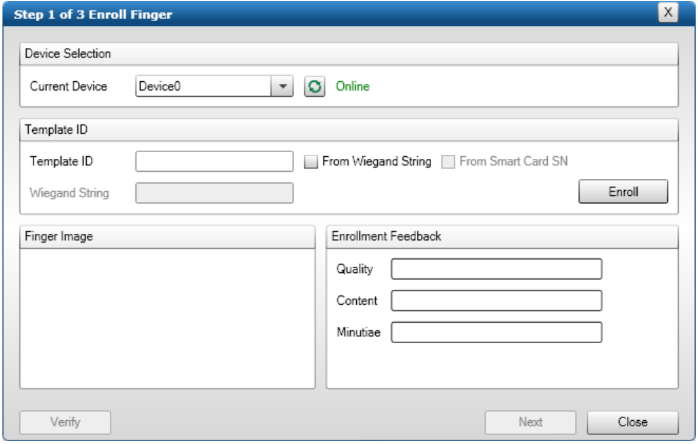
3. Tick the box „From Wiegand String‟ and then press the „Enroll‟ button.
4. The following message will appear prompting you to place the card to the reader.

5. Upon a successful read, you will see the card number appear in the Template ID field.
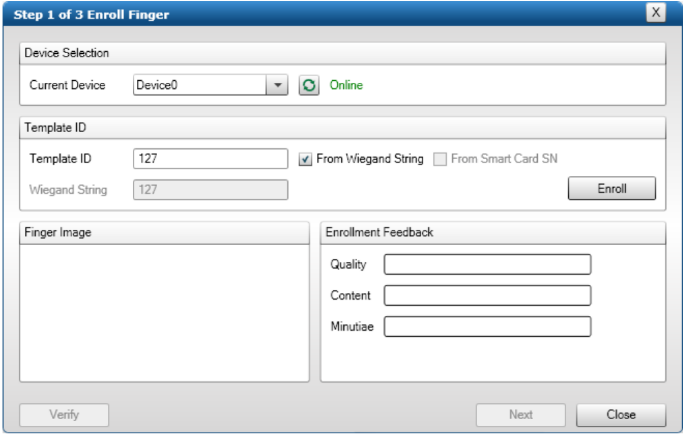
6. Now press „Enroll‟, in which you will prompted to present a finger to the reader. Once the finger
print has been read, the enroll box should look like this.
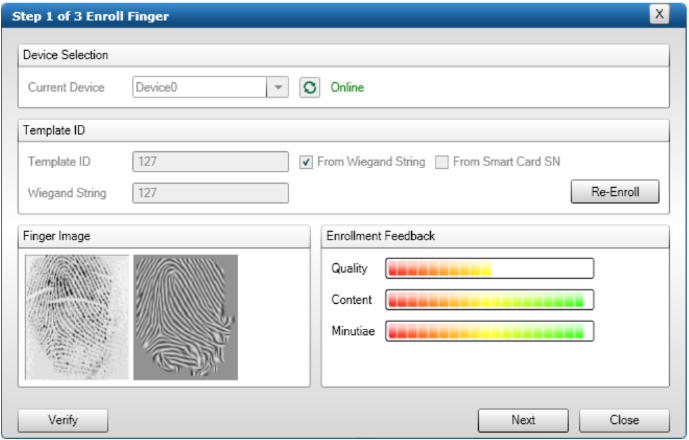
7. Press „Next‟
8. The following screen will now appear. This screen allows you define the User within Secure
Admin. Each User has to be unique within the system.
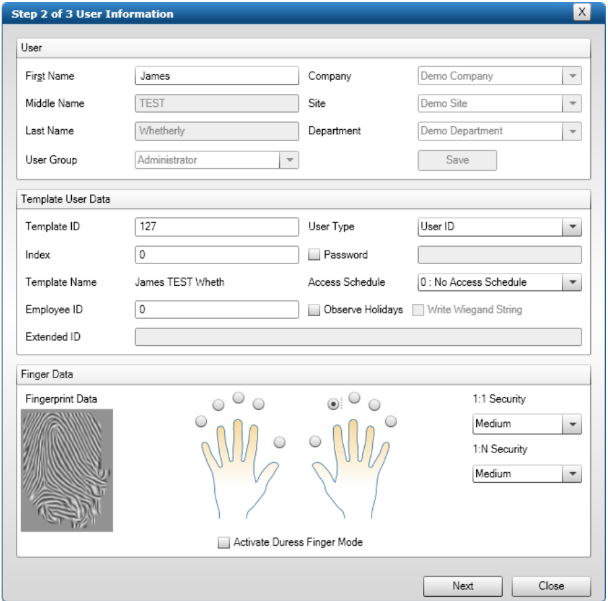
9. Once filled in press „Next‟.
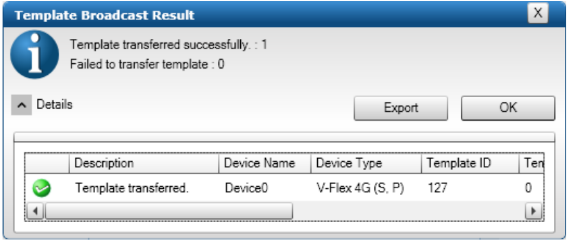
10. The Broadcast template screen will then appear. This allows you to push the template down to
the reader(s). This is entirely dependent upon the method you chosen to support the readers
and configure them for communications. You need to ensure the device or device group is
selected. Press „Finish‟ once checked.

11. Upon pressing the „Finished‟ button, a confirmation window will appear.
Symmetry Configuration
For Symmetry configuration both the software and hardware need to be configured as below.
Software Configuration
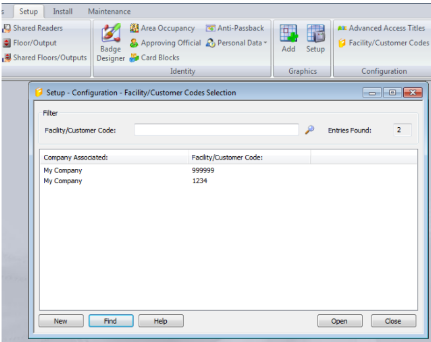
1. Add the Facility code into Symmetry. This can be located under „Setup > Configuration >
Facility/Customer Codes‟.
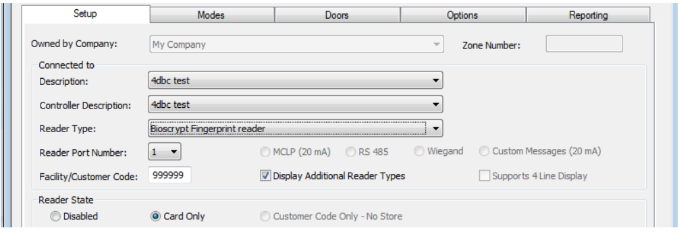
2. Under the reader definition for the given port you wish to use with the L1 reader, you will need
to change the reader format. You need to select „Bioscrypt Fingerprint reader‟, which is the
35-bit format.
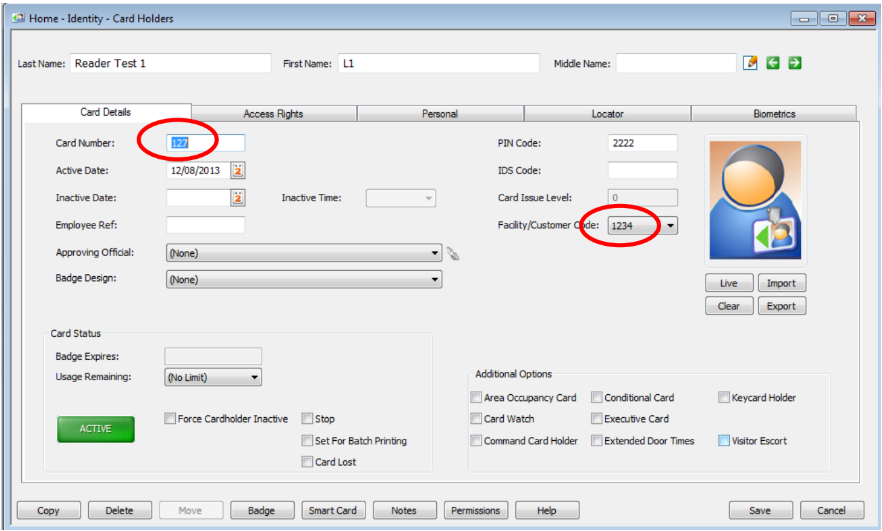
3. Next you need to assign a card holder with the correct credentials.
The Template ID you assigned the fingerprint in Secure Admin is to be used as the Card
Number in Symmetry, highlighted in red below.
You need to set the Facility/Customer Code of the user to the correct one, in this case 1234,
and also give the user „Access Rights‟ to the reader, using the „Access Rights‟ tab.
Hardware Configuration
1. Attach the L1 Reader a reader port on an M2100/2150 Node. Please follow the wiring
diagrams at the beginning of this document if unsure.
2. Attach a WIM Module to the board and set the Reader Port to Wiegand. If you are unsure on
this please refer to the hardware manuals for the Node you are using.
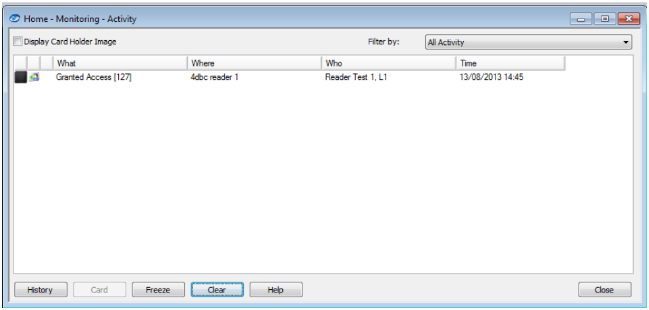
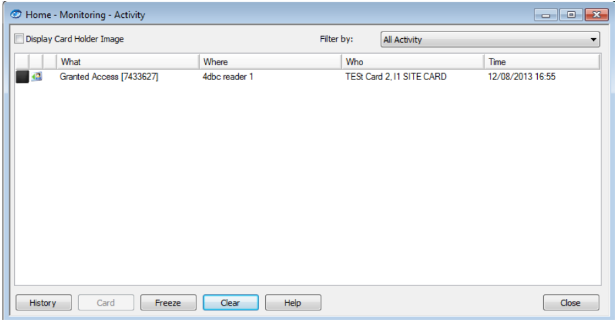
Testing the Integration
Both systems should now be configured in order for a card to be read at the L1 Reader and have a
valid „Granted Access‟ message displayed at the Symmetry System.
1. Present the card to the L1 Reader.
2. Present Fingerprint
3. Notice the door unlocks
4. Notice in symmetry you have a „Granted Access‟ message.
Different Card Formats
You may find that you have a different card format to that of the 35-bit format in Symmetry. For
example you may have 37-bit cards, which will require a few changes to the way the system is
configured. There are three items which will need changing.
The next part of the guide assumes you are configuring the system with 37-bit cards.
Due to the way that L1 output the wiegand string, dependent upon the card numbers being
used we have to configure the system to use a 38-bit format. This is because if you are using a
card which has a card number of 7433627 for example, it requires 23-bits just for the number. If
this is outputted by the L1 reader using a format setup of 37-bits, it would result in it being one
bit short, leading to wrong card numbers being reported in Symmetry. This is down to how L1
create the Wiegand output, so adjustments have to be made to get round this.
Please contact the Technical Support Department if you are unsure on this. For certain card
types you may also be required to send cards into us for investigation.
Input Wiegand Format
As mentioned earlier on in the guide you can change the format that the reader will read the cards
you present to it. You need to amend this to the correct input format. To do this select „Predefined‟
and use the drop down list to set the type of card you wish the reader to read. In this case set it to
„HID 37-bit‟.

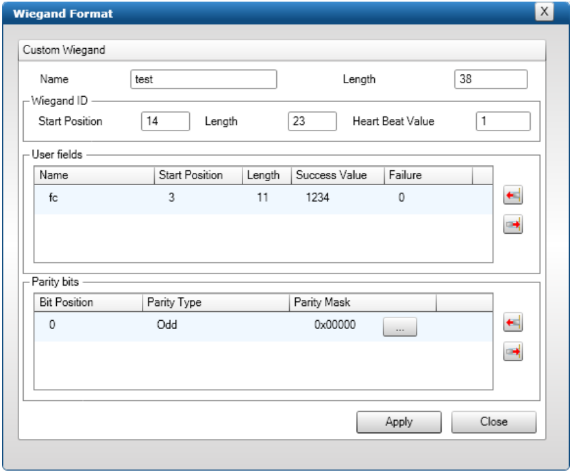
Custom Wiegand Settings
As the number of bits is bigger than the 35-bit format we used before, you will need to amend the
custom format to accommodate the larger number. From the above screenshot select „Custom
Wiegand Settings‟ and then edit the format or add a new format.
You need make the following wiegand format, as shown in the screenshot.
Symmetry Custom Format
You will need to create a new custom format within Symmetry. This is then sent down to the Node. If
you do not do this you will not get the same wiegand number in Symmetry to what you would in
Secure Admin.
1. Under Install > Default Settings > Reader/Card Formats.
2. Select the Bioscrypt Fingerprint reader format from the list.
3. Select the „Copy‟ button at the bottom of the screen.
4. You will then need to amend this screen as show in the below screenshot.
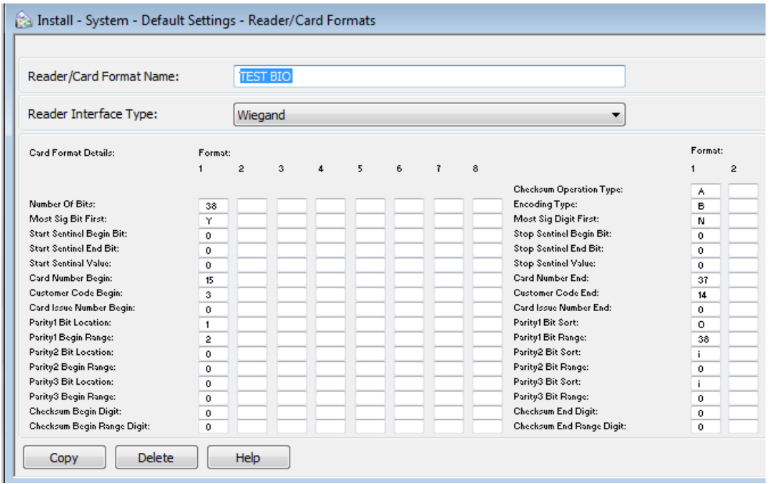
Number of Bits – 38
Card Number End – 37
Parity1 Bit Range – 38
5. You now need to set the reader to this custom format, under „Reader Type‟.
Testing the Custom Format
Upon presenting a card to the reader you should now be able to be granted access at the door.
Errors
A non standard error occurred code 1026
This means bad enrollment with low quality and content. Usually, your small finger is not good enough
for fingerprint enrollment as it doesn‟t give enough detail. We recommend using either first or middle
finger for the enrollment.
A non standard error occurred code 754
This means that the reader does not see the card, meaning that the card format may be wrong or that
the card could be faulty; advised to try another card.
Three flashing red lights when presenting the card
Informed by L1 technical support that this is most likely to mean there is a site key issue. Either the
site key in the reader does not match that of the cards or vice versa.
V-Flex 4G reader doesn’t appear to get enough power through microUSB
It appears the 4G doesn't receive enough power through the microUSB cable. When you plug it in
after a minute or so it should beep and flash the lights, which it never does (the status light will come
on however). I ended up having to apply the 12v connector (powered via a Node) at the back of the
reader in order for it to “boot up” correctly.
Comments
0 comments
Please sign in to leave a comment.