
Introduction
This guide outlines the steps required to encode an SR Card Number onto a Magstripe card using a
Fargo printer.
The guide assumes you have already installed the Symmetry HSE system along with the required SR
Node patches. You should be using Track 2 Magstripe readers. It is based upon Symmetry version 7.0.1 and Fargo Printer models DTC4000/4500.
The encoding is based on using the ‘10/12 SR Card Format’ using ISO Magstripe encoding.
Fargo Printer Installation
You will need to run the printer driver (current version 10131) before plugging the printer into the PC,
this can be downloaded from the HID Fargo website.
1. Double click the exe file, which will start the installation.
2. Select the language required.
3. Accept all default settings.
4. At the prompt plug the power and USB cable into the Fargo printer and PC.
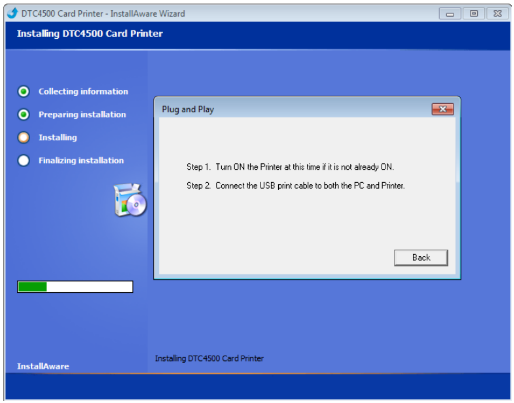
5. If prompted by Windows with the ‘Found New Hardware Wizard’, select to install the software
automatically.
6. Confirm that the printer has been successfully installed and reboot the machine.
7. In order to use the printer in Symmetry we need to change the default name of the printer.
Changing this depends on the Operating System you are using, but you need to amend the
name to say ‘fargo’ at the beginning.
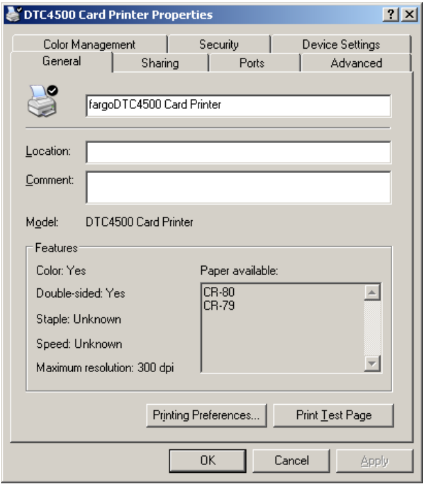
8. Set the printer to be default and configure the default ‘Printer Preferences’, such as setting
the card to landscape etc.
Setting up Symmetry for Magstripe Encoding
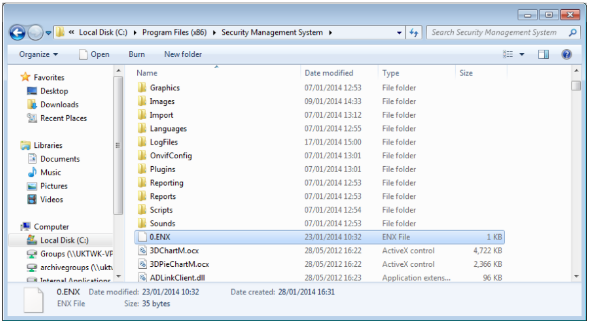
In order to encode Magstripe cards through Symmetry you are required to use an ENX file. In order to obtain an ENX file please contact your sales representative and state that you require one for SR Card Numbers.
1. Copy the ENX file into the root directory for the ‘Security Management Software’ folder on the main SMS Server. (Note: When a client logs into Symmetry this file will be passed down to the client for encoding)
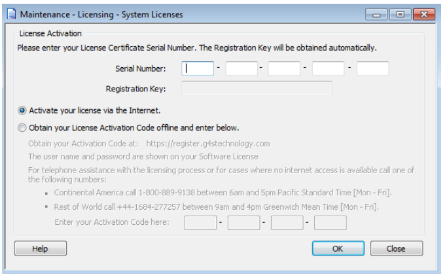
2. A valid Card Encoding Module License will need to be added to Symmetry if not already present.
To add the License select ‘Maintenance > System Licenses > Add’ and follow the steps with
registering the License Code.
3. In order to encode via a printer you will need to setup a badge template; if you don’t already have one. This can be found under ‘Setup > Badge Designer’.
4. Make sure to set the default printer for the badge to the correct setting, as shown below.

5. You will now need to modify the ‘Multimax.ini file’. Press ‘Start > Run > Multimax.ini’.
6. In order to encode the ISO Magstripe format you will need to enter the following line under
[Multimax]. ‘LegacyFargoPrinter=1’.
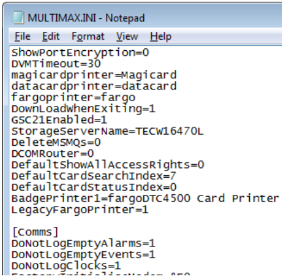
7. Also ensure that the line ‘BadgePrinter1=’ the name of the printer you have setup. (Note: This
will not be present unless you have setup a default printer for a badge design as mentioned in
step 4).
Creating a Custom Magstripe Format
In order to encode the SR Card Number to the card, it is required to setup a customer card format.
This format outlines the layout of the number.
1. Using the menu navigate to ‘Install > Default Settings > Reader/Card Formats’.
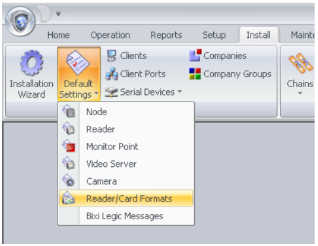
2. Select ‘New’.
3. This will then launch the window in which you can create the custom format. You will need to
give the format a name and then ensure that you set the ‘Reader Interface Type’ to ‘Future
Magstripe 1’.
4. You will then need to enter in the fields the values shown below:
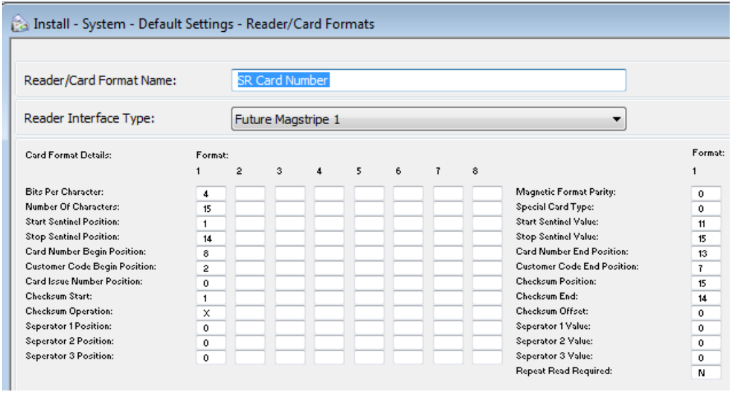
Table of entries can be found below:
|
Left Hand Column |
Right Hand Column |
|
4 |
0 |
|
15 |
0 |
|
1 |
11 |
|
14 |
15 |
|
8 |
13 |
|
2 |
7 |
|
0 |
15 |
|
1 |
14 |
|
X |
0 |
|
0 |
0 |
|
0 |
0 |
|
0 |
0 |
|
N |
Encoding an SR Card Number
To encode an SR Card Number you need to do this via the ‘Card Holder’ screen. This is on a per
Card Holder basis.
1. Navigate to ‘Home > Card Holders’.
2. Search and select a Card Holder or create a new one.
3. Ensure that the Card has being given a ‘Badge Design’. (Note: You can set badge designs to
be default for all Card Holders within the Badge Designer).
4. Press ‘Badge’.
5. Within the ‘Badge Print’ screen you will need to select the Custom Format we setup in the
previous section. This is set under the drop down box ‘Encoder Format’, and can be seen below.
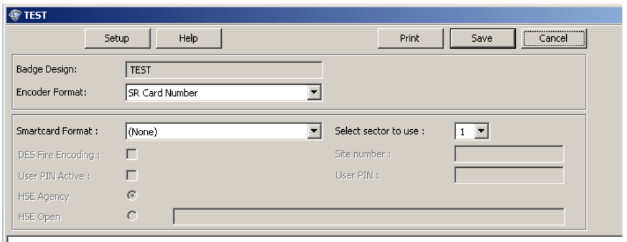
6. Press ‘Print’.
7. The card will now be encoded with Magstrip, using the SR Card Number.
Comments
2 comments
But you can close my request - think I found out what I asked for.
Best regards.
Lars Rahbek
Sorry, do not close request.
I still need the documentation for the second record generated in the DataExportTable.
Please sign in to leave a comment.