
Introduction
This document outlines some of the tasks you might be required to do when setting up or maintaining a Pelco DSExpress RealVue DVR. It does not cover the integration regarding Symmetry and also does not cover the use of Pelco’s own live video or playback applications.
Restoring the DVR
In order to restore the DVR you can use an ISO image provided by Pelco. This image launches
Norton Ghost built into the image. The image I was given was called “DigitalSentry Clean OS version
7.1.47”, this will reinstall Windows and drivers for the DVR. I was then required to install the full recovery image afterwards; not sure why as it seemed to do the same thing.
Once you have the base image on the DVR you can then remove the software or upgrade it to a
given version.
Complete uninstall of the Digital Sentry software
1. Uninstall the following from Add/Remove Programs (Programs and Features):
1. DS ControlPoint
2. DS Admin
3. DS
4. DS Video Server
5. DSWebService (if installed)
6. Microsoft SQL Server 2008 R2 (Note for version 4.2 or Later it will show as SQL Server 2005)
- Click OK under Setup Support Rules when status shows "Operation Completed".
- "Instance to remove features from:" DS_MSSQLSERVER > Next (Note for version 4.2
or later it will show as MSSQLSERVER) - Place a checkmark next to
1. Database Engine Services
2. SQL Server Replication
3. Management Tools - Basic
4. SQL Client Connectivity SDK
- Click Next > Next > Remove > Close
2. Tap F5 and most of the below items will have been removed, if they still exist; remove them
manually (DS version 7.1.90 and older used SQL Server 2005).
-
- Microsoft SQL Server 2008 R2 Native Client
- Microsoft SQL Server 2008 R2 Policies
- Microsoft SQL Server 2008 R2 Setup (English)
- Microsoft SQL Server 2008 Setup Support Files
- Microsoft SQL Server Browser
- Microsoft SQL Server Compact 3.5 SP2 ENU
- Microsoft SQL Server Compact 3.5 SP2 Query Tools ENU
- Microsoft SQL Server VSS Writer
Remove the following from Local Users and Groups (not always necessary, can be skipped)
-
- DSNVSUser
- SQLSERVER2005MSSQLUSER$workstationname$DS_MSSQLSERVER
- SQLServerMSSQLUser$workstationname$DS_MSSQLSERVER
- SQLServerSQLAgentUser$workstationname$DS_MSSQLSERVER
Check to see if any DS processes are still running using Task Manager, stop if needed.
Remove DS Services if they are still present (should not be needed with DS 7.3.x and above)
-
- sc delete nameofservice (run at the command prompt)
- Check for DigitalSENTRY VideoServer Utility (it runs under the local system account,
NOT dsnvsuser) and remove it.
Delete these directories (Note on non-64 bit version of Windows this will be in C:\Program
Files\)
-
- C:\DigitalSentry
- C:\Program Files (x86)\Microsoft SQL Server
- C:\Program Files (x86)\Pelco\Common Files
- C:\Program Files (x86)\Pelco\ControlPoint
- C:\Program Files (x86)\Pelco\DigitalSentry
- **C:\Program Files (x86)\Pelco\Database
- C:\Program Files (x86)\Pelco\VssUtility
- C:\Program Files (x86)\Pelco\Docs
- C:\Program Files (x86)\Pelco\DS Utils
- %programdata%\Pelco (Hidden folder)
- %appdata%\Roaming\Pelco\ControlPointCache.xml
**The configuration/database files are stored in the C:\Program Files (x86)\Pelco\Database folder, this
folder can be left without deleting so a new software installation can use the configuration files. This
folder should only be left behind if upgrading the software to a newer version and not downgrading.
7. Reboot HVR
Configuring PTZ
1. Go to start/programs/Integral/Flashguardtest. It will display detected on com 3 for example.
Whatever com port it detects we will add 1 to and that is the com port that will be used in
dsadmin.
2. Open DS Admin
3. From the directory tree, go to available systems>"server name">VAU then click on the server
name.
4. Select the "Serial Ports" tab. Verify that the com port determined in step 1 is in the Assigned
COM Ports field.
5. The general configuration should be - Interface Type: PTZ, PTZ Type: "select proper type for
camera". Click on Get Types if nothing is listed.
6. Verify the "Active" button at the bottom of the window is checked.
7. Click "Save". A pop up window will remind the user that changes will not take effect until the
Video Server Services are restarted.
8. Expand the "Cameras" folder in the directory tree then expand "Analog Cameras". Select the
PTZ camera you wish to configure. Select the PTZ tab on the top right.
9. Verify the "Enable PTZ support for this camera is checked. Select the down arrow for
"Camera connected to port" field and choose the previously configured camera type
10. Select the appropriate available address (corresponding with the input # under the general
tab).
11. Click save.
12. Verify PTZ control with the mouse in the camera viewing field.
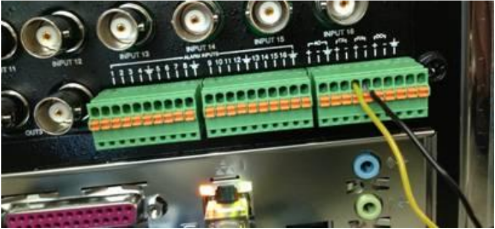
13. PTZ data wires should be connect on the back of the unit to TX+ and TX- (Usually a 6 pin
green connector using the 2 middle pins).
Resolve a database mismatch within the Digital Sentry software
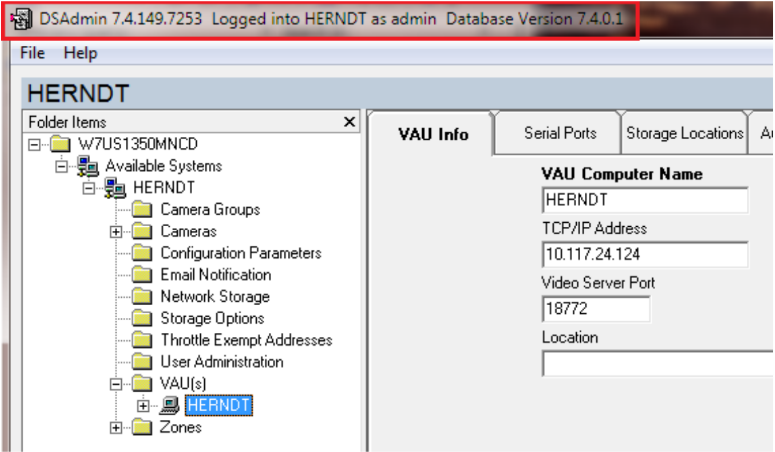
After updating the DS software or importing an older database backup, the DS database version does
not update to the current installed Digital Sentry software version, so this step is required.
This can be confirmed by running the DS Admin utility and once connected to the VAU, look at the
information in the title bar of the DS Admin window.
Example:
- DS v7.4.149 software should have a database version of 7.4.0.x
- DS v7.3.208 software should have a database version of 7.3.0.x
1. Go to Start > Run or Search Bar > type cmd then press ENTER
2. Run the following command in the command prompt.
sqlcmd -S localhost\DS_MSSQLSERVER -i C:\digitalsentry\ds_refresh.sql
3. The refresh script is complete when then DOS prompt returns, close the command prompt
window and verify DS Admin and database version now matches.
Adding an IP Camera
When adding a camera to the DVR you can run an application called DS Quick Setup. This allows
you to configure cameras into the system fairly quickly. It discovers any IP cameras and if not there is
a direct connection button you can use.
Comments
0 comments
Please sign in to leave a comment.