
Introduction
This document outlines the steps required in order to upgrade firmware on the M2150 range. It also
outlines the steps required to move a 2/4DBC from version 3.x to 4.x - please refer to the section
„Upgrading from V3.X to V4.X‟ for more steps on this. This guide is based upon version 2.3 of
Flash2100.
Encrypted NIC / CPNI recommendation
If you are using encrypted NIC cards then it is advisable to swap the encrypted NIC for a known
working unencrypted NIC to carry out the firmware upgrade. Use a standalone laptop or PC with a
network cable plugged into the unencrypted NIC to carry out the upgrade process.
Once the upgrade has completed, remove the unencrypted NIC and replace it with the encrypted NIC.
In the event that the node does not communicate with the Symmetry server after the upgrade has
completed and the encrypted NIC has been put back onto the node, complete a cold start of the node.
Upgrading the Firmware on a 2/4DBC or DC
1. Stop all SMS Services on the PC connected to the Node.
2. Start the Flash2100 application.
3. Select Configuration from the menu, Options > Configuration...
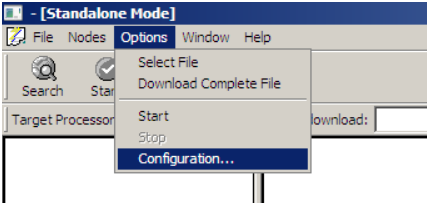
4. Select the applicable Chain Type and select OK on completion.
5. If Hardwired select the correct Comm Port and Baud Rate.
6. Dial Up (Not recommended).
7. For LAN enter the IP address of the NIC card you wish to connect to.

8. Select Window from the Menu bar and select Cascade. This allows you to see the comms
window for the Node.
9. Select Search from the Toolbar. You will see the comms messages being displayed in the
Comm 1 or Network screen. Upon successful connection, the attached chain should now
be displayed in the Standalone Mode screen.

10. From the Menu bar select the Target Processor as DCU. All DC addresses attached to the
Chain should be displayed in the Standalone Mode screen along with each devices loaded
firmware. An example of what it would look like if a 4DC was attached is shown below.
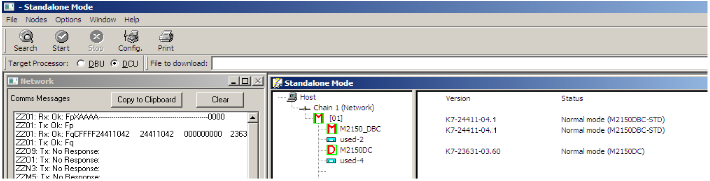
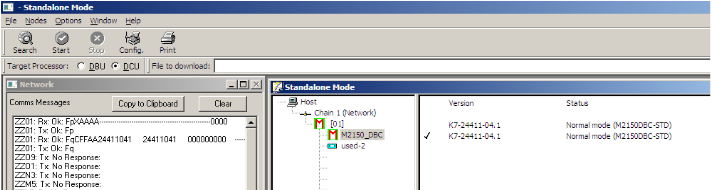
11. Select the applicable device from the list in the Standalone Mode screen by selecting the 2nd
line down of the applicable DBC; this will place a Tick next to the device.
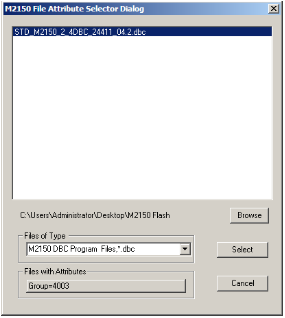
12. Select the Browse button from the menu bar; navigate to the folder where you have stored the
applicable firmware and select open. This will then also be displayed within the File to
download box.
13. Select the Start Button from the Menu bar. The progress should be displayed in the
COM1/Network window.
14. Upon completion, Flash2100 should restart the Node and refresh the Standalone Mode
screen. This will then display the firmware version that the board is now at.

Upgrading the Firmware on a DBU
If you upgrading the firmware on an M2150 DBU the steps outline above are to be followed. The only
difference is that when you go to select the firmware you set the Target Processor to DBU and then
tick the device in the Standalone Mode window.
Upgrading from V3.X to V4.X
If you are upgrading from version 3.x to 4.x on a 2 or 4DBC an extra step is required in order to
upgrade the firmware. You must first load an interim program into the board. This file is called
“UPGRADE_M2150_2_4DBC_23627_4.1.dbc”. To do this, follow the steps above as if you where
upgrading the firmware but instead of selecting the firmware file you select the upgrade file. Upon
placing this into the board the Node will be displayed as being in „Boot‟ mode. From here you can
then upgrade the firmware:
1. Setup connection to the Node (see section above)
2. Select the upgrade file
3. Start the upgrade
4. Now select the firmware version file
5. Start the download
NOTE: This is only for 2 or 4DBCs only, no other M2150 board requires this step.
Comments
0 comments
Please sign in to leave a comment.