
INTRODUCTION
A Few Things You Need to Know/Do Before Upgrading
- You can upgrade from versions 6.2SP4a through 8.0.x using the 8.1 upgrade utility when upgrading to V9 provided there is no Digital Video in the system. If upgrading 8.0.2 databases they must be at SP1 build level of (150802) or higher.
-
-
- The version of Symmetry you are upgrading from must be using SQL 2005 or later to create the backup files.
-
-
-
- Full backups of the multiMAX and multiMAXTxn databases from the existing system are needed for the upgrade.
-
-
-
- The 8.1 upgrade utility is used to upgrade databases to 8.1 on the V9 PC. You can download it from the partner site: https://partner.amag.com/group/partner/software. Copy the password and select the datacenter closest to you. Once there, open the Symmetry Access Control folder and then the Upgrade Utility folder. After download check properties of the zip file to UNBLOCK if needed before extracting files.
-
- Review the software installation guide before starting this process. Review the hardware and software minimum requirements to make sure the PC meets or exceeds these requirements. Chapter 8 “Upgrading Symmetry” has a prerequisites section that needs to be followed or the upgrade may fail.
- If the existing system has Digital Video:
-
-
- If it has Symmetry NVRs that need to be upgraded you will need to do a complete system upgrade to V8.1 first, following the processes in the 8.1 upgrade utility making sure you upgrade the NVRs before the Symmetry databases. After upgraded to 8.1 you can follow the upgrade instructions in Chapter 8 of the software installation guide.
-
-
-
- If there is a digital video integration, typically only newer versions of the integrated video are supported. Most likely there will be a new plugin needed. Please review with a sales engineer.
-
-
-
- If you want to start over in V9 with Digital Video then you will need to remove all current digital video devices along with related items such as; Scheduled, Predefined and Trigger Commands along with anything in Video/Identity Verification, Workflow, Intercom or Threat Level from Symmetry before creating the database backups for upgrade.
-
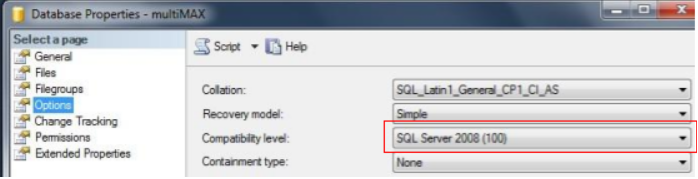
- Make sure the compatibility level for the multiMAX and multiMAXTxn databases are set to SQL2008 or higher once restored to the V9 PC. This is done before the upgrade process is started. This is found on the Options page when you go to Properties of each of the two databases.
Upgrading On a New PC
- SQL installation options.
-
-
- If installing a Symmetry Business or Professional system SQL Express 2014 (x86) can be installed for you by selecting the check box in the installation screen. Go to step 2.
-
-
-
- For Business or Professional, if you want a different supported version of SQL Express, you will need to install it before installing Symmetry. Make sure to select the default instance Radio Button during the installation process.
-
-
-
- If installing Symmetry Enterprise you will need to install a full version of SQL that is supported before installing Symmetry. Symmetry Enterprise allows SQL to be installed on a separate database server PC in a domain environment if desired.
-
- For the installation of Symmetry V9 software:
-
-
- Make sure to have full administrator privilege.
-
-
-
- Make sure the Pre-Installation tasks have been completed.
-
-
-
-
-
- For Business and Professional systems this is in the Software Installation Guide.
-
-
-
-
-
-
-
- For Enterprise systems it is in the Symmetry Security Hardening Guide.
-
-
-
-
-
- When installing a Business or Professional system make sure to select only the Symmetry check box when the installation wizard starts if SQL Express has already been installed. Otherwise select both before continuing.
-
-
-
- Follow instructions in the Software Installation Guide for the new installation.
-
- After the install is complete, license is activated, and you can verify that all services start and run with clean databases, create backups of all the clean V9.0 Symmetry databases.
- Stop the Message Queuing service in Services. This will also ask to stop all Symmetry Services, click “Yes”.
- Once all services have stopped set the Message Queuing service to Disabled so it won’t restart.
- Using SQL Server Management Studio, restore the multiMAX and the multiMAXTxn database backups from previous version of Symmetry into the new PC (Go to the “Restore Databases” section below).
- Once both databases are restored you can then start the database upgrade process.
-
-
- Run the 8.1 upgrade utility. In the Upgrade folder double click on the UpgradeWizardLauncher.exe file.
-
-
-
- When the upgrade wizard screen opens the Automatic Upgrade radio button is selected. Select the Advanced Upgrade radio button and click “Next”.
-
-
-
- The Source Database screen will open. The Main Path text box should show “C:\Program Files (x86)\Security Management System”. If so then click “Next”. If not, select the search button to the right of the Main Path text box and point to “C:\Program Files (x86)\Security Management System” and click “OK”, then click “Next“.
-
-
-
- The Destination Database screen will open. The Main Path text box should show “C:\Program Files (x86)\Security Management System”. If so then click “Next”. If not, select the search button to the right of the Main Path text box and point to “C:\Program Files (x86)\Security Management System” and click “OK”, then click “Next“.
-
-
-
- The Summary screen will open, click “Start!”. If a screen opens before the Summary screen showing one or both of the databases click “Disconnect” and then click “Start!”.
- The Summary screen will open, click “Start!”. If a screen opens before the Summary screen showing one or both of the databases click “Disconnect” and then click “Start!”.
-
-
-
- When the upgrade completes click “OK”, review the ToDo file shown and close it, then click “Finish”. The ToDo file and upgrade engineer log can be found in the “C:\Program Files (x86)\Security Management System\LogFiles\Upgrade” folder.
-
- Now that the databases are at V8.1 you can run the V9 installation following the steps below.
-
-
- Go to Services and right click on the Message Queuing service, go to properties, set the service back to Automatic and start it.
-
-
-
- Start the installation of Symmetry V9 again and select Repair from the choices of Change, Repair and Remove when that screen appears.
-
-
-
- The databases will be upgraded during the installation process. Once the installation is completed verify all Symmetry Services are running. You can now log in to Symmetry.
-
Upgrading On the Same PC
- Verify that the OS is supported with Symmetry V9. Must be a 64-bit operating system. Refer to the software installation guide for Hardware and Software Minimum Requirements.
- Stop the Message Queuing service in Services. This will also ask to stop all SMS Services, click “Yes”.
- Once all services have stopped set the Message Queuing service to Disabled so it won’t restart.
- Create backups of the multiMAX and multiMAXTxn databases.
- Uninstall the current version of Symmetry including databases. Remove leftover Security Management System folders. Depending on Symmetry versions the leftover folders would be in the Program Files (x86) folder and if version 8.0.x or later in the ProgramData folder.
- Verify that SQL is supported with Symmetry V9. Refer to the software installation guide for Hardware and Software Minimum Requirements.
-
-
- If supported verify that it is at the correct service pack. SQL 2012 SP2 (11.0.5058.0), SQL 2014 SP2 (12.0.5000.0). If not then download and install the service pack needed. Make sure to download the correct x86 or x64 version of the service pack.
-
-
-
- If the version is not supported then uninstall it. Make sure to remove all listed items for SQL in Programs and Features. Then remove all leftover SQL folders. These could be in the Program Files and Program Files (x86) folders.
-
- Set the Message Queuing service back to Automatic.
- Reboot the PC at this time.
- SQL installation options if un-installed.
-
-
- If installing a Symmetry Business or Professional system SQL Express can be installed for you by selecting the check box for SQL Express in the install wizard screen.
-
-
-
- For Business or Professional, if you want a different supported version of SQL Express, you will need to install it before installing Symmetry. Make sure to select the default instance during the installation procedure.
-
-
-
- If installing Symmetry Enterprise you will need to install a full version of SQL that is supported before installing Symmetry.
-
- Install Symmetry V9.0 software following instructions in the software installation guide. Make sure to have full administrator privilege.
- Once installed verify that all services start with clean databases and create backups of all the fresh Symmetry databases.
- Stop Message Queuing service in Services. This will also ask to stop all Symmetry Services, click “Yes”.
- Set the Message Queuing service to Disabled so it won’t restart.
- Using SQL Server Management Studio, restore the previous version multiMAX and multiMAXTxn database backups into the system (Go to the “Restore Databases” section below).
- Once both databases are restored you can then start the database upgrade process.
-
-
- Run the 8.1 upgrade utility. In the Upgrade folder double click on the UpgradeWizardLauncher.exe file.
-
-
-
- When the upgrade wizard screen opens the Automatic Upgrade radio button is selected. Select the Advanced Upgrade radio button and click “Next”.
-
-
-
- The Source Database screen will open. The Main Path text box should show “C:\Program Files (x86)\Security Management System”. If so then click “Next”. If not, select the search button to the right of the Main Path text box and point to “C:\Program Files (x86)\Security Management System” and click “OK”, then click “Next“.
-
-
-
- The Destination Database screen will open. The Main Path text box should show “C:\Program Files (x86)\Security Management System”. If so then click “Next”. If not, select the search button to the right of the Main Path text box and point to “C:\Program Files (x86)\Security Management System” and click “OK”, then click “Next“.
-
-
-
- The Summary screen will open, click “Start!”. If a screen opens before the Summary screen showing one or both of the databases click “Disconnect” and when the Summary screen appears click “Start!”.
-
-
-
- When the upgrade completes click “OK”, review the ToDo file shown and close it, then click “Finish”. The ToDo file and upgrade engineer log can be found in the “C:\Program Files (x86)\Security Management System\LogFiles\Upgrade” folder.
-
- Now that the databases are at V8.1 you can run the V9 installation following the steps below.
-
-
- Go to Services and right click on the Message Queuing service, go to properties, set the service back to Automatic and start it.
-
-
-
- Start the installation of Symmetry V9 again and select Repair from the choices of Change, Repair and Remove when that screen appears.
-
-
-
- The databases will be upgraded during the installation process. Once the installation is completed verify all Symmetry Services are running. You can now log in to Symmetry.
-
Comments
0 comments
Article is closed for comments.